Contact Vicki
If you have any questions or would just like more information please don't hesitate to get in touch by clicking the button below and filling out the contact form.
Contact VickiI am so fortunate and honoured to have met and learnt from Ginny Phang-Davey from iBirth Professionals, who shares her knowledge and experience with us on how to use the basic OMP PROTOCOLS during pregnancy, labour and birth for a better birth experience. The great thing about Ginny is she is so authentic about these protocols and doesn’t claim ownership of them – they have been universally practiced for many, many years, so she has credited each person who originally shared the techniques, however she has enhanced many of the techniques in her own wise way so they are even better.
During our training Ginny said “Once you discover these tools, practice and apply what you learn alongside your birth professional colleagues, and you will have the confidence to know HOW to support women during labor & birth even when labor stalls. YOU will have the confidence to read a woman’s body to know WHAT to do, WHEN to do it AND HOW to reduce unwanted and sometimes unnecessary medical interventions. These are proven techniques that when utilised during pregnancy, labor & birth can not only ease pain and discomfort yet can turn traumatic situations around during labor & birth and provide non-pharmaceutical pain relief and enable labor to progress. Imagine giving that gift to mother’s.”
You can watch this quick video to find out what OMP is all about:

1.1 OMP Side Lying Release
The Side-lying Release is typically safe before and throughout pregnancy, even into early labour and should be done on both sides. Helps to balance and relax the pelvic floor, lengthen and loosen the round ligament and psoas muscle and release the iliotibial band and fascia on the outside of the thigh. You need to hold this stretch for a minimum of 3 minutes, and always maintain a hand on the hip to hold the hip and body in a straight alignment, and also so the mum feels safe and doesn’t feel like she is rolling off the table. Don’t do this technique if you have any bleeding, unexplained cramping, feeling unwell or you experience pain. Swap over and do the other side.
1.2 Diaphragm Release
Once you have established the side-lying release you can also then add the diaphragm release to stretch out the diaphragm and ribcage. This will help mum to feel she can breathe more easily and have a lot more room for baby to move. Do both sides and again holding for a minimum of 3 minutes. You can also massage through the glutes, hips, legs and ischial tuberosity (sit bones).
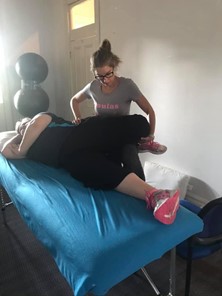
1.3 Psoas Release
This is a really good stretch of the psoas muscle (which is a big inhibitor of baby being able to move down into the pelvis). It also stretches the hip flexor and round ligament. Stop if you feel any pain. This stretches the psoas muscles (major and minor), round ligament, hip flexors and iliac crest of the hip. Hold this stretch for a minimum of 3 minutes, then swap over and do the other side.
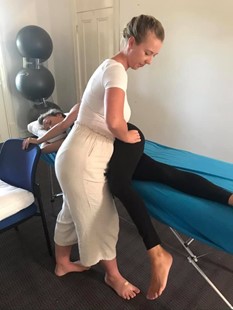
1.4 Forward Leaning Inversion
This techniques helps to untwist the ligaments of the uterus and creates room for baby to move into position and helps the cervix to dilate more easily during labour. This is a very slow movement, and you do not rest your head on anything, it just drops down. You take 3 breathes, then slowly come back up again, sit up straight on the back of your legs and do another 3 breathes to ease back into being upright. Do not do this technique if you have high blood pressure, hypertension, dizziness, reflux, heartburn, glaucoma, sinus problems, head cold or if you are more at risk of stroke.
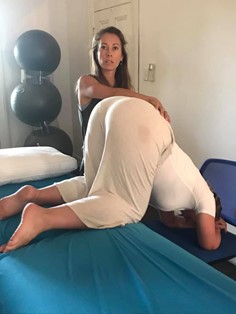
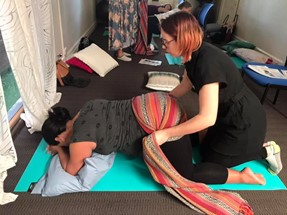
1.5 Pelvic Floor Relaxer
I call this the “booty hammock” or is is also commonly known as “shaking the apple tree” and this is about “jiggling” the bottom and hips to release tension. Make sure that the rebozo is not sliding over the area – it should be gripping the hips and bottom so you get that jiggle and it is quite a rigorous shaking for 2 to 3 minutes but no pushing down on the body it is a side to side movement. This technique is to release the fascia, pelvic floor, muscles and ligaments.
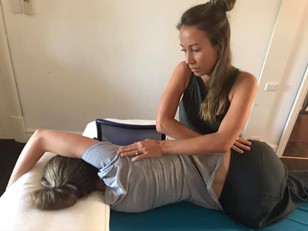
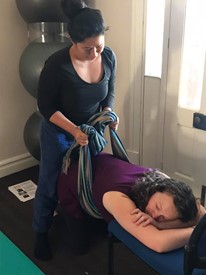
1.6 Abdominal Sifting
I call this the “belly hammock” and it is important to remember the positioning of the hands (milking a cow) otherwise your wrists may strain. The movement is slow and gentle, not rigorous shaking, and helps to relax the abdominal muscles, pelvic floor and round ligament. If you have an anterior placenta be cautious – we do not know if this will have any effect on the placenta, and so far there has been no negative side-effects, but it is important to be gentle and if you feel any discomfort stop. You need to do this for a minimum of 2 to 3 minutes, making sure that you maintain the lift of holding mum’s belly weight, otherwise if you drop the hands down, then you are not holding and supporting the belly, therefore there is no benefit.
Ginny Phang-Davey has created some excellent resources along with a fantastic online course for women to understand OMP so it is effective and will help you understand the dynamics of why labour can slow down or stall.
If you would like to learn more, click on the link:
If you have any questions or would just like more information please don't hesitate to get in touch by clicking the button below and filling out the contact form.
Contact Vicki